Showing posts with label DIY. Show all posts

Sunday, June 28, 2009

Centerpiece Mock Up

I love this table setting, I am hoping to get the exact look for my bridal table. Half the centerpieces will be roses in a square vase and the other half will be candles with shells that I am setting up on my own.


Mock up Trial


Wednesday, December 31, 2008

Iron Ons

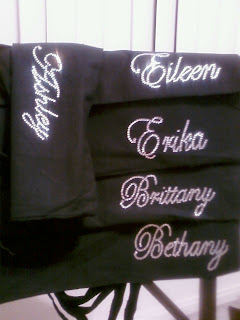
My Bridesmaids totes are complete!!


This is the finished product.

Knottie Sushi gave me a link to some great intructions on how to make these bad boys, I was clueless to say. Wedding by colors, Gratefulbride Blue Wedding Here are the instructions. I hope it can help out you as much it saved me. I ordered my totes from cheaptotes.com for .99 cents. For some reason Michaels was not getting any shippment on them and I grew impatient and ordered them online. I bought Mylar paper on ebay for $8 bucks from crystalsdesigns. Flatbacks from Knottie Sushi for .70 cents a gross. I am pretty pleased with the way they came out.

Monday, December 1, 2008

Cake Topper

I ordered my cake topper from Craftyeddy@gmail.com. Its a 5in Edwardian Script.


I am still in the process of searching for flatback rhinestones. I know of Ebay, Dreamtime Creations, Rhinestoneshop, and so0o0o0o many others. But the only thing I do know, I will get Gem Tac from Michaels.

Monday, November 24, 2008

Flower Girl

So instead of the typical flower girl dress, I wanted something that they could wear and again and not worry about getting dirty the day of the wedding. After looking through Davids Bridal and many other flower girl websites, there was nothing that I really liked. I began googling flower girl dresses and came across this cute tutu dress. I soon found out that these are the new trend for weddings, especially for beach weddings. I found that there are many Esty shops but they were ranging $50-$100. So I googled for instructions and came across "Sweet n Sassy" that had excellent directions. So I will be ordering tulle from Save on crafts and Cudge.net and start on making these probably in January.


Thursday, November 13, 2008

Bridesmaid Jewelry

I knew that I wanted to make something for my Bridesmaids but didn't know where to start. After seeing a post in the Making It Personal Board, I knew this is what I wanted to do. After an email to Knottie BryanandKatrina, asking for the directions, she so graciously sent them over and off I went to Michaels to purchase the supplies. But before that I printed out about ten 50% coupons and off I went. I found the crimper for $14.00 and with my awesome coupon, it only cost $8. Found sizes 4mm, 6mm, 8mm white pearls each were $1.50 after the coupon.
{Picture from Knottie BryanandKatrina}

{Picture from Google}

After dropping the little one at school, I got to work on these babies. I didn't purchase enough wire so I was only able to make three out of the four neckalces and two bracelets for the Flower Girls. Each necklace cost about $5 to make.


Pearl Necklace Instructions

Must haves:
CRIMPER
JEWELRY WIRE
DOUBLE SIDED SATIN RIBBON
WIRE CUTTERS
PEARLS
SEED BEADS
CRIMP BEADS
TOGGLE CLASPS

This was my first time ever making jewelry. It was actually relaxing, lol

I bought sizes 4mm, 6mm, and 8mm Pearls from Michaels with my coupons!!

I cut the jewelry wire 18in. Placed the wire through the toggle clasp and crimped it. I strung 10 4mm pearls first but between every pearl I strung a seed bead after each one. Be sure to do this through out the whole necklace (The jewelry lady said that it is not good for your pearls to rub against each other, especially if they are real) After 10 4mm, I strung 15 6mm and 12 8mm pearls. Took another toggle clasp and crimped it. My ribbon was cut 18in, I liked how the ribbon draped down the back. Put it through the toggle and hot glued it so it was secure.
{I wanted to take pics, step by step but my camera decided that it was going to break. Gotta love technology}

Monday, November 10, 2008

Pomanders

Well I actually tackeled another DIY project. After my florist told me that these babies were gonna cost $35 each I figured, what the heck, a fake flower ball would be better. Besides the flower girls would never know and I thought that they could keep it forever. I think this was one of the easiest things that I have ever done. Next the unity candle. Here the pics to my finish pomanders.


Each ball cost $9.68. I picked up the balls at Walmart for $3.48 along with the flower wire 88 cents. Took a trip to Big Lots and in their Fall stuff, shoved way in the back, I found the flowers. They were $1.75 for a bunch of ten, so about 18 cents a flower. What a steal.

Friday, November 7, 2008

Bridesmaids Cards

I wasn't even going to make anything, I was just going to simply ask my girls if they would be a bridesmaid in our wedding. After looking at all the DIY Bridemaids cards, I thought it would be nice to make them something. One night I saw a Knotties bio that had the cutest bridesmaids cards and I so desperately wanted them for my girls. Only problem, I had no idea how to make them. I emailed Knottie Michelle and she so graciously helped me out. She made me four bridesmaids cards from the "27 Dresses Movie" I absolutely love them. I can't wait to scrapbook these as well. I want to take pictures giving them to my girls. Coming Soon.

As soon as I figure out how to upload the images I will post them. I want everyone to see Knottie Michelle Fabulous work. Thanx again!

Well after a weekand of making my bridesmaids cards, I finally finished them and I am very very happy with them. Here are some pics.


Inside of the card reads, "I promise not to make you wear an ugly dress!" Love Ashley


Too cute!!

Pocketfolds

So as weeks went on, I got more and more into The Knot, searching and picking out pictures that I liked and would love to have something similar in our wedding. I came across "Making it Personal" Board. This is where I found my new inspiration for the wonderful "Pocketfolds" After multiple posts and the same dreaded question over and over, How to make Pocketfolds, I was kindly directed to Road to The Aisle. It was after looking at this freaking wonderful blog, that I had my heart set on making these. Went out to Michaels and bought all the supplies that I needed. After multiple attempts and tantrums, I kept searching when I came across Road to Wed, her and I have the same color scheme and I loved how she made her invites black. They looked so classy and elegant. I was orginally going to do Azaela Pink Pocketfolds but after actually seeing her invites I totally changed my mind. So I finally made a mock up.

Thanks to Knottie TxSun, she made my monogram, which I absolutley love. Its different from the many attempts that I tried to do myself.


Thursday, November 6, 2008

Invitation Mock ups

So after many many many months of planning our wedding, we have seen numerous invitations that were just to expensive or just not what we were looking for! After visiting the last Bridal Expo I was determined to at least book one or two consultations for invitations. After three hours of walking around and grabbing the freebies (who doesnt like the free magizines) there was a husband and wife who had a boutique in Laguna Beach. We made an appointment the following weekand. I picked out a few that I liked, but at $8 an invite and .50 cents extra for a map per invite, the total was out of control. We didnt even discuss any other paper item.

So on our way home, hubby said, "Lets go to Michaels, (you dont have to tell me twice to go the happiest place on earth) I know we can make the invitations that you like for half the price." We grabbed some paper, ribbon, glue, and tape and headed home, determined to make something decent. With multiple tries we finally had something quite amazing.


Hubby is very proud of his work, he did the measurments and sizing and I did the designing. We are very happy on how they turned out. Well after working on this invite, Hubby was pooped and went to bed. I decided to pull out my scrapbooking stuff and see what else I could come up with. Which led me to making the white one.

I have always loved swirls and knew that that is what I wanted to have on the invites, problem was, I couldnt find any that I really liked and I really did not want to have to pay for a graphic. Well after many hours of Knotting and Googling, I came across this site where she offered her brushes and image packages for FREE!! Yes FREE!! I downloaded the images and went to work in Photoshop. I am not the best in Photoshop but after playing around and listening to a billion tutorials, I managed to change the colors to my liking and came up with the pink swirl above.


Monday, November 3, 2008

Save the Dates


I finally Finished my save the dates and I am pretty pleased. I got the idea from The DIY Bride by Kris Cochran. The first few were torture until I finally figured out the correct to do them. After numerous trips to Michaels, I finally had what I needed to knock these out. Since our wedding is off the beach, I wanted something fun but not in the typical beach colors, Blues, Greens, Tans. I love PINK and had my mind set on pink, black and white. A trip to the OC Swapmeet and I had all the seashells that I will be using for my centerpieces and picked out these tiny little starfish that fit perfectly behind the clear sheet, added a teaspoonful of sand and whoo la!